Friday, April 30, 2010

DollarStore plaques REVAMP

I found these at one of the dollar stores in town a few years back. I liked the sayings on them and had them hanging in my hallway.
I've been updating my decor a little by little and thought I would try and revamp these little goodies.


I found some scraps of MDF and Trim and spary painted them black.
With the help of my wonderful step-dad, we laid out the pieces and figured out kind of a framed in pattern. . .kind of. . . the pieces were scraps so we had to make do with what we had.


A little bit of locktite and some drying time later. . . .


The middle section was done and then the sides were added.


Does any one know where to get some ALMOST INSTANT drying glue? Hahaha. . . I am super impaitent and HATE waiting for things to dry. . .


Here it is. . . I hung it up in the hallway again where the sayings were to begin with.


I think it turned out pretty nice.
Big props to Jim for all his help:)

Posted by Picasa

Thursday, April 29, 2010

Easy Hair Bow Holders

I came across a similiar idea on someone's blog the other day but I can't seem to remember where I saw it. (I follow a TON of super talented, crazy creative blogs)
I knew I wanted to try and make one so I made a trip to the dollar store to see what I could come up with.


I found some large, unfinished wood certificate frames that I figured would work just fine. (In hind site, I wish I would have held out for a bigger frame at the DI. . . . Like one that would take up most of a wall in the kid's bathroom)
I also found some decent ribbon there so I grabbed a few spools of that as well. After a little spray paint and some hot glue, I ended up with this. . . .

 
I left the glass in the frame because I knew that it would probably end up in the kid's bathroom and for some reason (Wild and Crazy Kiddos Splashing in the TUB), the walls in there get a little wet from time to time and I didn't want the paper to get ruined. Well, its not actually paper either. . . .I took a gift bag that I liked the print on and chopped it apart to fit the frame.


Super cute hair bows, huh?? I have to give props to Sadie for the Organza ones. :) She gave them to me but I've been forced to share with the girls. . . I have my own secret stash of hair clips and flowers in my bathroom but apparently its not such a big secret since they find their way into the girls's hair every now and then.
Here is another holder I put in the kid's bathroom. It has a little more room for storage with the pieces of ribbon hanging down.
 

I planned on taking a picture to show what it looked like with some clips on it but Magoo was being such a wonderful little helper with the decorating and had it so full you couldn't see anything but FLOWERS. I couldn't talk her out of taking a few off JUST for a picture but I think you get the point.


This one also has a fun little spray paint Faux-Finish on it.


The picture really isn't showing the finish very well but its kind of a fun one to mess around with sometimes.

-Paint your item your base color and let dry.
-Take your secondary color and spray over the top of the first.
-Then take a spritz bottle and mist some water over the paint. It will kind of seperate and bubble.
-Let your water/paint coat dry and then take a paper towel or a cloth and blot the item to break the bubbles. It might need a little more drying time after this step if the bubbles had any water in them.
I usually seal mine with a coat of clear laquer or poly urethane.

Posted by Picasa

Tuesday, April 27, 2010

Half undone Fixer upper

I think this was on of those 'finish it yourself' wood tables that never got around to quite being finished. I found it at the DI and I think it was marked 5bucks.


It looked like someone had attemped to slap some stain on it but pooped out about a third of the way done. It was super easy to sand this lil' feller down and get the little bit of stain that was smeered on the top off. I ended up having to prime this though because the legs were all still raw unfinished wood.


I think it turned out pretty good.


Posted by Picasa

Monday, April 26, 2010

A little change in the living room. +an UPDATE

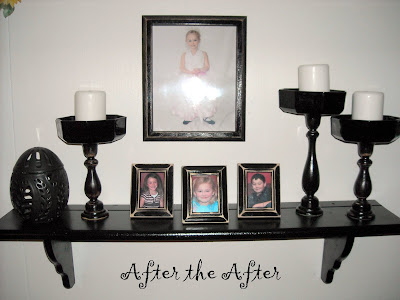
My poor little shelf has been red since about 2002 so it was seriously time for an update. I just got (some of) the new pictures of the kids up there and tore it all down to try and give it a little makeover. . .


I sprayed the shelf black along with the picture frames and distressed them a little. . . .a coat of poly uthretane and done!


I probably should update Magoo's baby pic up top (since she's 4 1/2 now) but overall I am liking the little overhaul. . .

A slight change can sometimes make a big difference.

UPDATE:
I finally got Magoo's dance pictures and they turned out fabulous so I decided to change out the picture up top.
I had also been working on some candle stick revamps and added those to the mix.


. . . .Ta-Dahhhhhh. . . .

Posted by Picasa

Sunday, April 25, 2010

Shelf Makeover

I'm sure someone spent a lot of time and effort on this little shelf. It kind of made me sad to have to destory it. . . . kind of. . . .


It wasn't as fun cutting it appart as I thought it was going to be. The wood kept splitting and splintering everywhere so the back looks like total sh . . . . . .crap. (What a job keeping this blog rated PG13 when you have a mouth like a sailor)

It had a ton of varnish on it too and I sanded it until I was sure I would wake up the next day with biceps like Arnold.

The lighting in the kids room totally sucks too but colors are watermelon and grape. . .


. . . .fruity colors for a fruity little shelf. . . . .

Posted by Picasa

Friday, April 23, 2010

Tested but not Bested- and an UPDATE :)

I've seen quite a few of these weird little bowls at the thrift stores lately. I haven't figured out what the doo-hicky in the middle is for though.
 
Posted by Picasa

I decided to chop this one out but it wasn't such a grand idea because the hole when all the way through and it was a hefty one. Grrrr. . .

 
Posted by Picasa
I then took a hand saw and proceeded to cut down the knobby thing I removed into a disk to cover the hole.

Not such a good idea either. . .

Instead of using a clamp or a sturdy table to hold the knob while I was cutting, I just held it in my left hand and managed to slice more off my thumb than I did said knob. . .grrrrr.
A few bandaids and some splintered wood later, I salvaged a chuck of the knob and got it loctited in.

After I had stopped bleeding and the loctite had time enough to cure, I whipped out the sandpaper and showed my evil bowl who was boss. (Pay back from the day before).

Now to decide what color it was going. Black? Eh. . . I have tons of black. . Cream? Maybe. . .
To make a long story short and save you most of my complaining, it got a coat of every color of paint I had and I hated every one of them.
By this time, I'm not having so much fun and was really considering chuckin' my bowl in the trash. . .

One more try and if it turns out like crap, its getting burnt. I had had enough trouble out of it and thought it was my duty to spare any other revamper the heartache of this horrid little monster.

This is what I finally ended up with.


I actually made the twine ball from a styrofoam ball I found at the DI for $.50 (had a Roberts Craft price sticker still on it for $4.49. Score!) I had a roll of jute and had seen another blog where they had hot glued some twine onto a nerf ball so I decided to try and make a similar one. Two words: Time Consuming!
The other ball I also found at the DI for $.75. I saw the exact ones in Wally World about twenty minutes before hand priced at $10 for 3. Score again!


UPDATE: It was Allison at HoH that did the nerfball to deco-ball. She is fantastic! Check out her tutuorial and make a few for yourself. Like I said before though. . . .they are super time consuming but totally worth it in the end :)

PS: Those weird bowls are for nuts. The little do-hicky in the middle with the little holes are to hold the nut cracker things and tools to get the shells off. I saw another one of these at the DI and it had all the pieces to it and I had one of those "OOooooOOOoo. I get it now moments" when I saw what it was for. hehehehe

Posted by Picasa

Thursday, April 22, 2010

Plant Stand Revamp

Here's another little goodie I found to fix up. . .


I constantly have the Rolling Stones - "Paint it Black" blasting in my brain walking through the thrift stores. . .


You can't go wrong with black distressed furniture. . .


I may be doing some rearranging so I can keep this one. . . I really like how it turned out.

Posted by Picasa

Wednesday, April 21, 2010

Bench Revamp

I'm not sure if this was a sewing bench or what. I found it at a garage sale and the guy told me it was a piano bench. . . its awfully short and narrow for a piano bench but whatever.


Here's the after photos. . .
I really am going to have to break down and get a new camera. I couldn't get a decent pic to save my . . .uh. . . .neck. . . .


Posted by Picasa